Technical Issues - FilmStar News 2008
Other editions:
2006, 2007,
2009, 2010,
2011, 2012, 2013 January 29 CIE Range 380-780 nm The latest versions of DESIGN and MEASURE include changes in CIE color calculations: 1. The CIE range is now 380-780 nm (previously 380-770). While this makes no difference in calculations (unless you have a 775 nm laser), it was not strictly in compliance with ASTM 'Standard Practice...' E308-06 (available from http://astm.org). 2. CIE tristimulus values digitized from ASTM E308-06 Tables 1-2 are now utilized. Previous values were copied from Wyszecki and Stiles 'Color Science' (who stopped at 770 nm). 3. We added all the illuminants in E308-06 Tables 3-4 (A, C, D50, D55, D65, D75, F2, F7, F11) and deleted illuminant B which was declared obsolete by CIE. (Previous illuminants were A, B, C, D65.) Illuminant E corresponds to uniform illumination and is also included, as is black-body. As before, any number of user-illuminants can be defined. User-illuminants should now include the range 380-780 x1 or x5 nm. 4. THESE CHANGES RESULT IN THE FOLLOWING FILE INCOMPATIBILITY: older versions of DESIGN and MEASURE will issue an error message when loaded files saved with the current version. (The error can be ignored if you are not using CIE color. If you are using CIE color, be sure to check CIE Setup Parameters.) 5. Users who want to verify FilmStar CIE color calculations can download Bruce Lindblooom's excellent Excel spreadsheet:
February 11 MEASURE (Scantraq) Auxiliary Serial Communications 1. MEASURE UPGRADE...In response to a user's request for FilmStar MEASURE (Scantraq) to communicate with a PLC (programmable logic controller) we have added new BASIC commands. In this case the PLC will automate filter handling and significantly reduces labor costs for 100% inspection. These commands control an auxiliary COM port, say COM2 if COM1 is used to control the spectrophotometer. Typically a string, say "F", is sent to trigger the PLC (get next filter) and a string, say "D", is returned when the PLC sequence is completed (filter in position). comAuxPortOpen 2, "9600,N,8,1" ' open port COM2 comAuxSend "F" ' get next filter If comAuxWaitString("D", 120) Then ' wait until done comAuxPortClose ' close port Scan End If Sub Disconnect was added for instruments controlled by Mpe950 and Mpe19AX. (We're not sure if this is required, but added it just in case.) Disconnect ' disconnect Lambda server comAuxPortOpen 2, "9600,N,8,1" ' open port COM2 comAuxSend "F" ' get next filter If comAuxWaitString("D", 120) Then ' wait until done comAuxPortClose ' close port Initialize ' reconnect Lambda server Scan End If These new commands are independent of instrument control routines and are included in all MEASURE versions, even those which do not use serial communications. Commands are documented in the printed manual and online help. We suggest testing with a second computer running Hyperterminal and connected via null-modem cable. 2. CIE COLOR...CIE calculations in DESIGN and MEASURE now use official CIE data tables (CIE D001) for 1 nm interval. Previously we interpolated 5 nm tables. This makes negligible difference in results and does not affect 5 nm calculations. February 28 Identifying DESIGN Work Files IMPROVEMENT FOR SHARING DESIGNS ON A NETWORK...Exiting DESIGN (or clicking File..Save All) stores current design parameters in a 'Work File'. Later, when you run DESIGN (or click File..Open All) current settings are recovered. The problem with storing designs in a shared network directory that you can easily open a colleague's Work File instead of your own! This issue has been addressed (DESIGN 2.60.1120) by adding User Name to the Work File. The (FILM Archive) Work File now becomes
This features is enabled as follows:
The User Name also appears in configuration file design.ini where you might see entries like this: WorkName@Hillary Obama=bbar WorkChange@Hillary Obama=0 0 -1 0 0 WorkName@Laura Clinton=highpass WorkChange@Laura Clinton=0 0 -1 0 0 2. WINDOWS 98 ISSUES...DESIGN and INDEX no longer work in Windows 98. This has been the case for about a year, but was just reported. MEASURE and MONITOR will run as long as FSPlot (MEASURE) and the Coating Game (MONITOR) are not used. To prevent crashes, these features are now disabled when using Windows 98. March 10 Layers Mode Editor Updated
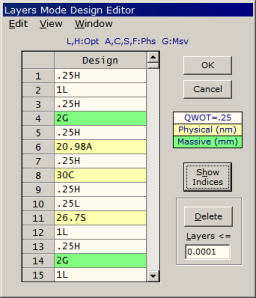
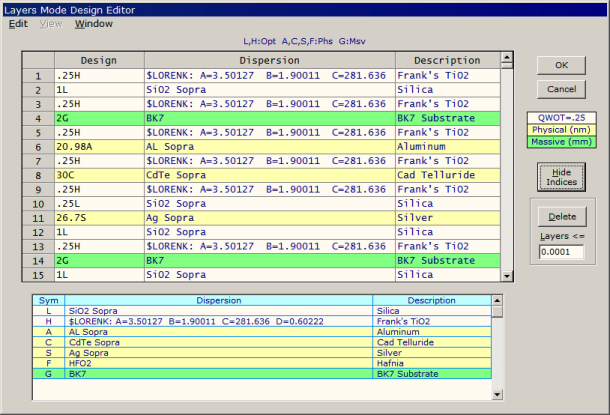
The screen below shows what happens when View... Index Columns is checked, Show Indices is clicked, and the dialog box enlarged. Too much information? Probably for most designs, but the feature is really intended for designs containing many materials, as might occur when simulating inhomogeneous layers. As a design is edited, the index columns are updated automatically. Index columns also work in Extended Materials mode (Film Indices > 52).
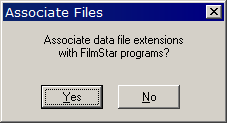
Addendum...If all film materials in Film Indices include a description, the Layers Editor Description column includes pull-down lists instead of static text. Changing a Description cell updates the corresponding Design and Dispersion columns. Click here for further information. 1. AUTOMATIC SPAM REJECTION...In order to reduce spam, we now automatically reject RBL flagged e-mails. There is a tiny probability that legitimate e-mail will be rejected. If you find we do not reply to your e-mail in a timely manner (a few days), please inform us by telephone at +1 609-924-6222 . 2. FILE ASSOCIATIONS...FilmStar now supports file associations. This is the Windows 'Open with' facility which lets you double-click on a file name in Windows Explorer and start an application with a particular data file: DESIGN *.faw FILM Archive INDEX *.itw Index Table MONITOR *.mww Optical Monitor Worksheet CRYSTAL *.cww Crystal Monitor Worksheet MEASURE *.scw Scan Method You can also use the Start...Run facility by typing in something like c:\Winfilm\Design1.exe c:\Winfilm\Designs\bbar.faw or even c:\Winfilm\Designs\bbar.faw by itself (if associated). The FilmStar installer can associate file extensions for you if you select 'Complete FilmStar installation' in the Installation Type dialog. The following dialog then appears:
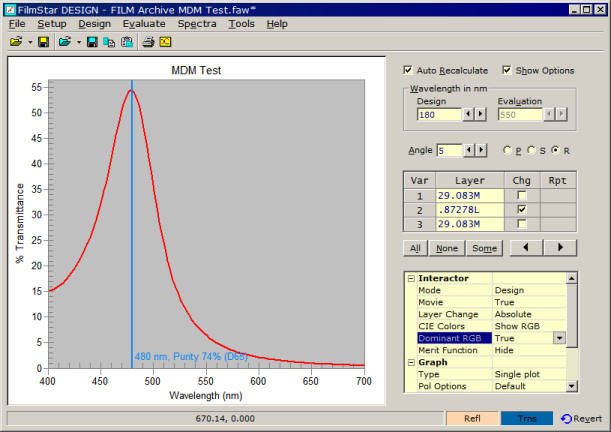
You can also associate file extensions in Windows Explorer by right-clicking on a file name and using the Open With dialog. 3. MEASURE WORK FILES...MEASURE users can have a problem when controlling multiple machines from the same computer. When starting MEASURE, an inappropriate Work file might be opened. In order to minimize this possibility, MEASURE now stores different Work files for the six different executables. For example: Work@MPE983.scw, Work@MCARY5.scw, etc. May 9 Angle-Dependent Indices, Nicolet Support 1. A FilmStar user wanted to implement discrete angle-dependent indices as a User-defined Index Function. Consider a material where the index is one value for angles less than 20 deg and another value above 20 deg. This is set up as follows in the User Defined Index Functions dialog: n = -2.3*(ANG<20) - 2.1*(ANG>=20) or if using index tables instead of constants: n = -N1*(ANG<20) - N2*(ANG>=20) Here '# Coefficients' = 0 since the incident angle is the only variable. The tricky part is the minus sign, since logical expressions like (ANG<20) return -1 if True (0 if False). 2. After testing and comparing with PE 983 measurements, a FilmStar user in New England purchased a Nicolet FTIR (Thermo Scientific). We were pleased to discover that its software (Omnic) has a well-documented COM interface and can be controlled by MEASURE via simple FilmStar BASIC macros such as the following: Option Explicit Dim OmApp As OmnicComLib.OmnicApp Const qe$ = Chr$(34) In this case Mpe983.exe is used and the device is set to 'Server (Raw Data)'. June 10 Dominant Wavelength DESIGN 2.60.1400 adds dominant wavelength and purity. The facility is enabled by setting Interactor Dominant RGB to True with Interactor CIE Colors set to Show RGB and Graph Type set to Single plot. The dominant color line disappears when it is undefined (purple zone <400 or >720 nm).
To display the dominant color line in its RGB color, set
Appearance Line Colors to RGB. (Otherwise the line is
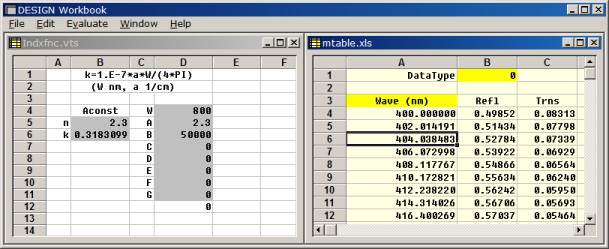
displayed in Magenta, which in some cases will be more legible.) June 25 Interactor Workbook Capability DESIGN 2.60.1501 adds FilmStar Workbook capability to the Interactor. In order to support user-defined Workbook index models, the Workbook must be opened from the normal DESIGN window so that indices are defined before the Interactor is activated. As indicated in the screenshot below, the Workbook can be utilized for both spectral analysis and n,k computation. Clicking on the Workbook window updates its spectrum as usual (assuming a DATAMARKER cell has been defined).
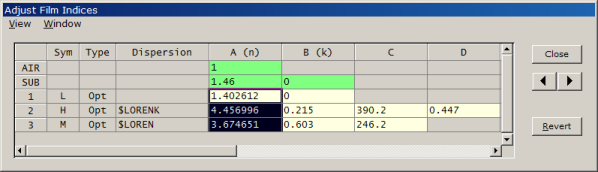
As an alternative, set Workbook to True under Automation in the Interactor Options box. Then the Workbook is automatically updated without having to click on it. Several Workbook menus are unavailable in Interactor mode and multiple spectra in adjacent columns are not possible. Exiting the Interactor, while leaving the Workbook open, restores normal Workbook operation. As indicated in the 29 Oct 07 FilmStar News, the Interactor supports index changes via Setup... Adjust Indices. This has been extended to allow changes in multiple coefficients (as might occur if a single column is common to several user-defined index functions). Cells can be highlighted by clicking on a column header, or by depressing the shift key while dragging the mouse. Multiple selections are possible, but probably not very useful. Selected inactive (gray) cells are ignored. Should a selection 'stick', click Window.. Clear Selection to get rid of it.
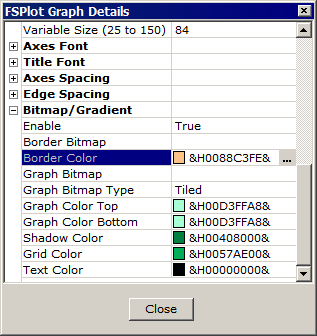
July 22 FSPlot Bitmap/Gradient Mode Explained Do you use FilmStar plots in presentations? Why not add a bit of color and pizazz? We find it very useful to use FSPlot's Bitmap/Gradient mode. In this slide for EOS Glasgow 2008, we matched the graph border color to the PowerPoint background color:
Bitmap/Gradient mode is found at the bottom of FSPlot Graph Details:
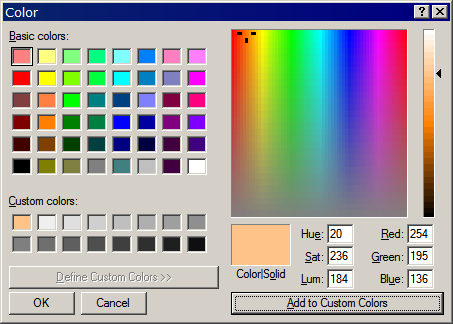
Click the Border Color properties box ... leads us to a dialog where we enter the same RGB values used in PowerPoint:
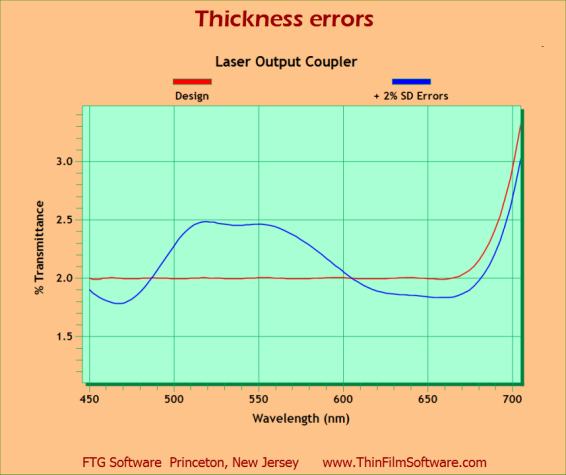
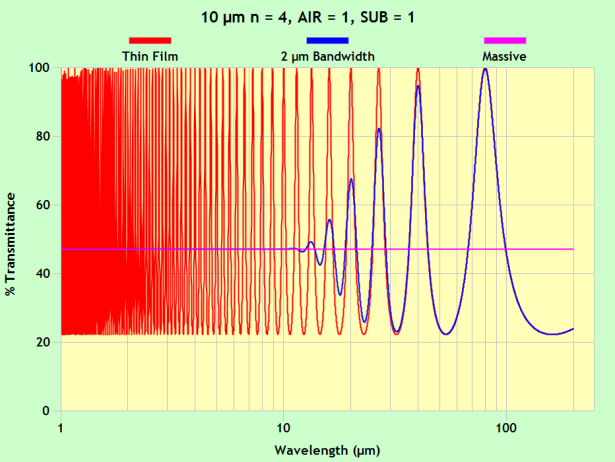
These complex settings can be saved for future use by taking advantage of the FSPlot code generator which, among other settings, includes those for Bitmap/Gradient mode: PlotBitmapMode = True PlotBitmap(1) = "" PlotBitmap(2) = "" PlotBitmapType = 2 PlotBitmapColors 8963070, 13893544, 13893544, 5746176, 0, 4227072 PlotTableColors 16777215, 0, 0, 0 August 1 When is a Layer Massive? Recently, a question arose about FilmStar's massive layer calculation. A user had assumed that very thin layers could still be treated as massive. This is incorrect. The following graph illustrates our analysis. Ultimately, a layer is 'massive' when interference fringes are averaged. Once the wavelength is too high for multiple internal reflections, the film is 'thin'.
Here we used monochromator averaging to smooth the data
(Spectra...Smooth Data). Averaging over a film thickness distribution would give
the same result. Note how the (FSPlot) log wavelength scale enhances
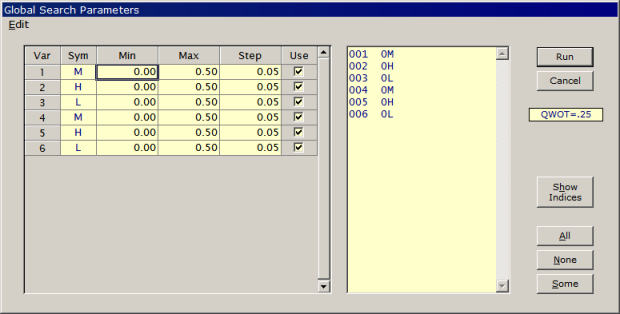
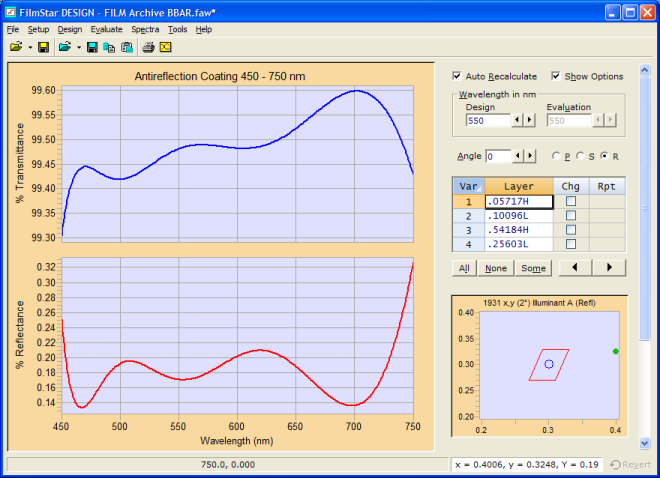
understanding of wide-range phenonomona. September 25 DESIGN Global Search 1. Papers presented at the 2008 Optical Systems Design meeting in Glasgow:
'Gedankenspektrum' Methods in Optical Coating (Paper PDF) Gedankenspektrum methods were illustrated by actually running FilmStar. Attendees were surprised to learn that further research for the paper was to be performed while giving the paper! Users are invited to download these FilmStar BASIC macros and continue the work we started. As related by a gentleman from Tucson, the Gedankenspektrum paper was already referenced in the next day's optical coating session. Something like... "Did you consider Goldstein's method?" 2. DESIGN 2.60.2000 adds Global Search. Select Search in the Optimization Algorithm toolbar pull-down or Global Search in Optimize...Algorithm. This method also works in the FilmStar Workbook and allows searching within groups of layers (within parentheses).
The current thin film design is used as a template. That is, to
add 3 more layers to the design illustrated above first add the layers in the
Groups Mode or Layers Mode design editor. Then click Optimize.. Parameters
(saves values) or Optimize.. Optimize (saves values and runs search) to adjust
parameters. DESIGN warns if there are too many iterations (> 2^32) and indicates
the approximate calculation time when estimated to be longer than 5 minutes. In
the above case, there are 11^6 = 1,771,561 iterations.
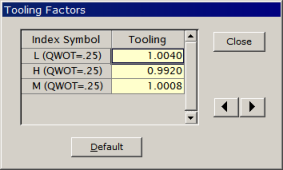
October 10 Tooling
Factors in Interactor
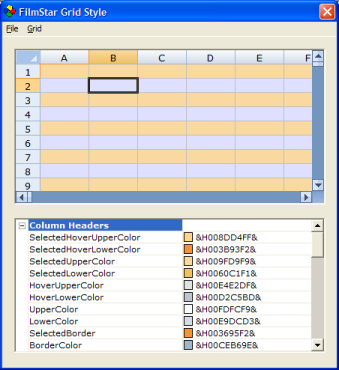
December 11 Grid
Colors
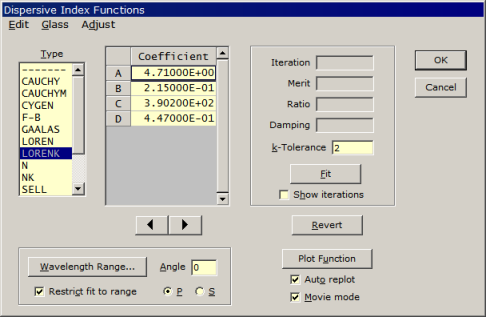
December 23 Index Functions in Interactor As shown here, INDEX 2.50.0320 adds Interactor-style increase/decrease arrows in the Index Functions dialog. Select one or more cells in the Coefficient grid and click an arrow to increase or decrease. As in the Interactor, press and hold Ctrl to increase the interval and Shift to decrease it. In the Adjust Menu, F4 decreases the coefficient by 1.0 and F5 increases by 1.0.
Movie mode automatically calculates and replots while an arrow is held down. This is the recommended setting for most computers. (Otherwise the calculation takes place when the mouse button is released.) Unchecking Auto replot may be required to prevent 'Function not defined' errors. The error often occurs when initially setting up a dispersive index function or when Restrict fit to range is not selected. |
Copyright © 2023 FTG Software Associates
Last updated on
January 02, 2024